Most of this is drawn from the CMU Sphinx iOS Demo repo: https://github.com/cmusphinx/pocketsphinx-ios-demo
Really, they just offer a build script to help compile the code for use in Xcode. The README is pretty spartan and hardly explains much.
Also, it doesn’t matter if you already have pocketsphinx installed or not. We’ll be compiling the code here from source for use in Xcode.
If you want to just get sphinxbase and pocketsphinx installed on your mac (and I’m assuming you’re on a mac, because dealing w/ xcode on anything else is a nightmare), refer to my previous post HERE.
Getting Started
I’m just going to take their instructions at the beginning and go through them step by step:
You need to build both sphinxbase and pocketsphinx.
First clone both from github. Grab the iOS repo too to get the build script:
mkdir project
git clone https://github.com/cmusphinx/pocketsphinx-ios-demo.git
git clone https://github.com/cmusphinx/sphinxbase.git
git clone https://github.com/cmusphinx/pocketsphinx.git
then run autogen.sh inside both in order to create configure.
You need to have autotools installed for that.
OS X comes with autotools, but you can run the following command to check:
which autoconf
which automake
The output should point to executables in /usr/local/bin/ Then run the autogen scripts:
cd sphinxbase
./autogen.sh
cd pocketsphinx
./autogen.sh
Then copy build script in sphinxbase folder and in pocketsphinx folder.
This is referring to a script file in the iOS example repo. This tripped me up for a bit. The script you want is located in the first repo we cloned.
The file is entitled build_iphone.sh, so just copy that over into both the sphinxbase folder and pocketsphinx folder.
cp build_iphone.sh ../sphinxbase/build_iphone.sh
cp build_iphone.sh ../pocketsphinx/build_iphone.sh
Make sure the script has execute permissions. If it doesn’t, run this:
chmod +x build_iphone.sh
Build
Then, navigate back to the directory you downloaded the sphinxbase to with the git clone command. Then run this command to build it:
./build_iphone.sh
If it complains, it might suggest that you run “make distclean” there first. This resolved the issue of having already run the autogen script.
It’ll take some time to make it, but hopefully at the end, it should finish without errors.
Then go to pocketsphinx and run build there.
Do the same thing for pocketsphinx. Change to this folder and run
./build_iphone.sh
Script takes a list of architectures to build as an argument.
To build everything:
./build_iphone.sh
To build arm64 libraries:
./build_iphone.sh arm64
To build fat libraries for armv7 and x86_64 (64-bit simulator):
./build_iphone.sh armv7 x86_64
I personally just stick with the build_iphone.sh script to build everything.
Fruits of Labor
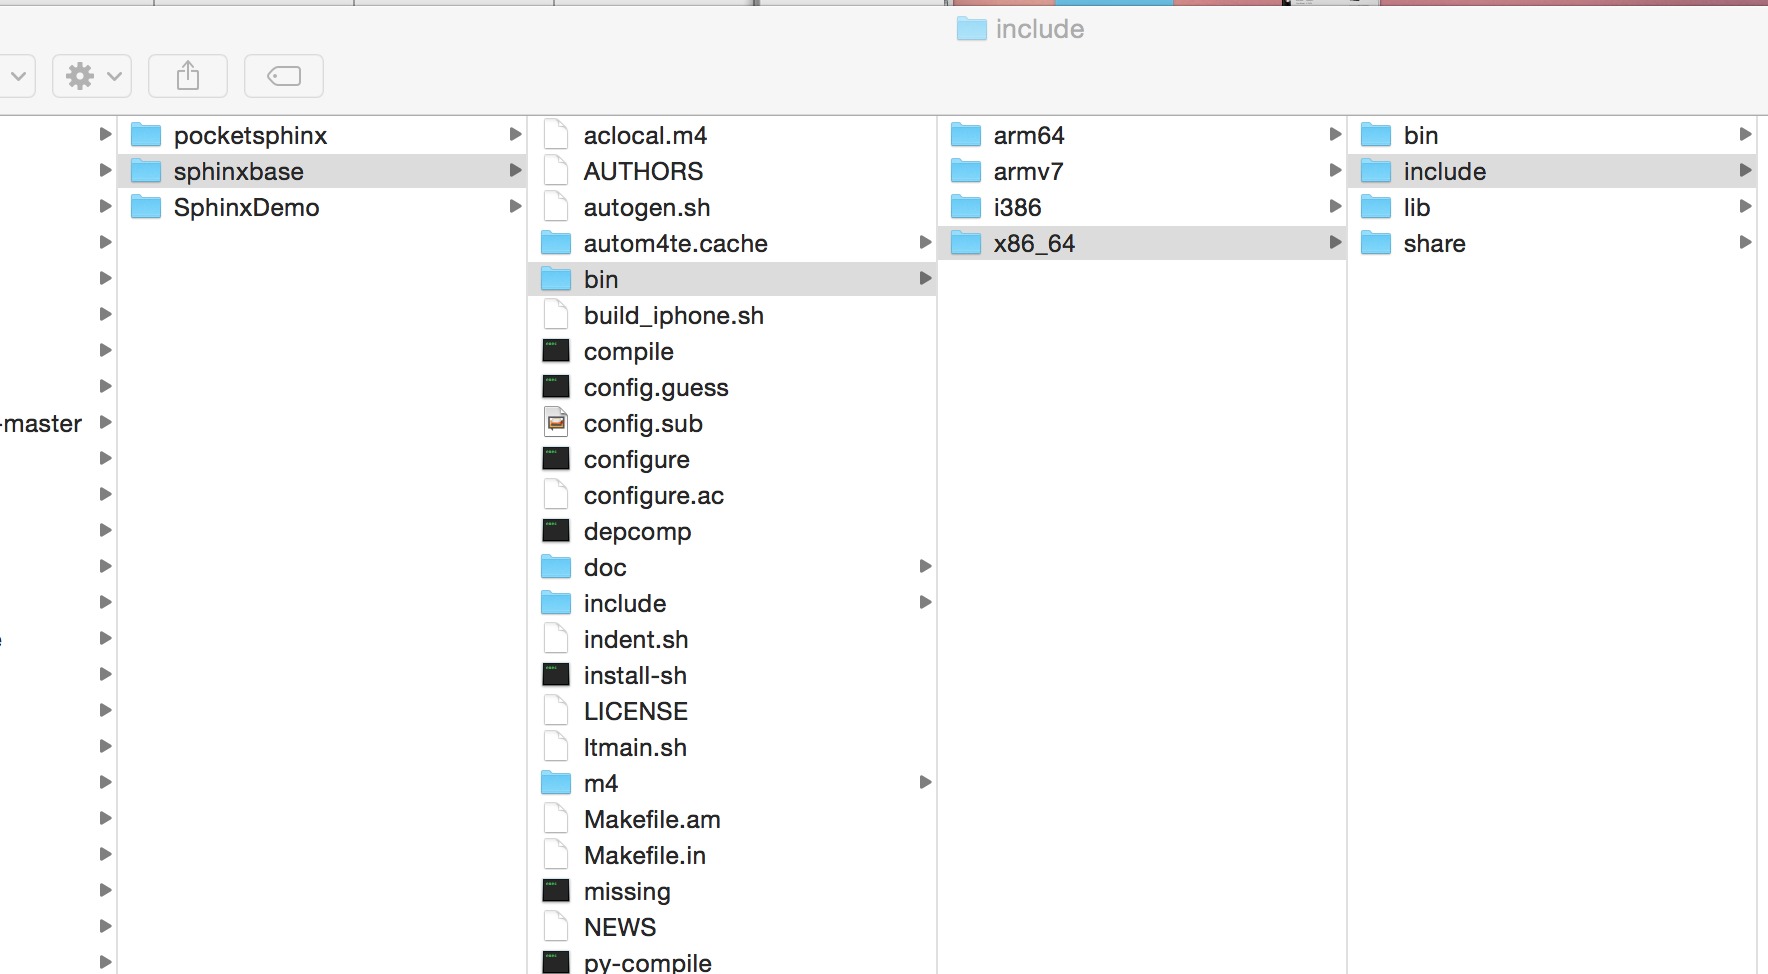
When it’s said and done, you’ll find a set of files in the bin directory within each of the sphinxbase and pocketsphinx folders. After navigating to the bin folder, you’ll see separate folders for each architecture you chose to compile for.
It should look something like this:

There are 4 folders for each architecture. The ones you’ll be concerned with are the include and lib folders. The include folder has all of the header files, and the lib folder has all of the compiled libraries.
There are a few ways you can go from here. Most of the time, after you compile some libraries from code, you’ll want to copy it over to your /usr/local directory. This isn’t the right move, as you can’t even run some of these as they’re compiled for different chips. Plus, you might start borking with stuff you already have installed.
Either way, you’ll want to move the compiled libraries to some location that you can access from Xcode. Obviously take note of this location.
Fire up Xcode now. Either open an iOS app project or create a new one. You’ll want to go to Build Settings. This is easily accomplished by going to the project navigator on the far left and clicking on your project name. This will most likely take you to the General tab. The Build Settings tab is in the middle, a few to the right.
Scroll down to Header Search Paths and add the path to include folder for one of the architectures you compiled for. To work with the iphone simulator in Xcode, use the x86_64 set. (It shouldn’t matter which header files you use though, just the lib)
/path/to/compiled/x86_64/include/sphinxbase
Next, go to the Library Search Paths and add the path to the respective lib folder containing the precompiled libraries.
/path/to/compiled/x86_64/lib
The third and final step is to scroll up a little bit to the Other Linker Flags setting and add
-lsphinxbase
If you did everything right, you should be able to build your app without getting any build/linking errors. It doesn’t do anything at this stage, but the table’s set. In my next post, we’ll walk through actually getting some usable code in a basic iOS app.